The advanced section of the guide will finally get into scripting logic and practical application. We will cover logic, formatting and viewing objects, and output.
Logic
Logic operations are the meat and potatoes of PowerShell scripts, and it’s rare to have a script with more than a few lines without them. Even if you don’t use them directly, some of the built-in commands are really doing logic operations in the background obfuscated by a simple and short command.
Let’s go over a list of some of the logic commands you might see:
For
Foreach
If
Else
Elseif
Do-while
While
That’s a lot, and there are actually more than that too, but it’s a good foundation to do nearly anything that you can think of in PowerShell. Let’s start going through them.
If
if (condition) {

}
If is a staple of scripting and you will use it in nearly every script you write. The structure is basic, you are saying “If (the thing you want to evaluate) { then do this stuff }”. This can take a few forms, but the simplest example is to check if a value is true/false greater than/less than/equal to etc. and then based on that write a something to the console or set a variable to another value.
$Variable = 6
if ($Variable -gt 5 ) {
    Write-Host "Variable is greater than 5"
}
I’m setting a variable to 6 and then using If to check if the $Variable is greater than 5, and if that is true then we write to the host “Variable is greater than 5”. If I change the $Variable to 4 and run the script again it will return nothing.
Else
With a modification of the script above we can include Else into the mix to get even more verbose with our script:
$Variable = 4
if ($Variable -gt 5 ) {
    Write-Host "Variable is greater than 5"
} else {
    Write-Host "Variable is NOT greater than 5"
}
This will return:
Variable is NOT greater than 5
Else provides a nice way to cover situations where a value can be true/false but still let you write something to the console or change a variable value in either case. What if you have more than two possible cases though?
Elseif
Elseif (else if) is very similar to both else and if just combined. Elseif won’t end the if check like else will, so you can have as many Elseifs after an if statement as you would like. If we add an Elseif to the script above it might look something like:
$Variable = 5
if ($Variable -gt 5 ) {
    Write-Host "Variable is greater than 5"
} elseif ($Variable -eq 5) {
    Write-Host "Variable is equal to 5"
} else {
    Write-Host "Variable is NOT greater than 5"
}
Which will return:
Variable is equal to 5
For
For has some very interesting applications, and is the first time you can really feel like you are actually programming in PowerShell. Let’s digest the next script and see what is happening:
for ($i = 1; $i -le 5; $i++) {
    Write-Host "$i"
}
This looks different than other scripts we have gone over so far, and there’s a few new concepts in there. $i is of course just a variable, it could be anything. We are setting $i = 1 then following with ; to get to the next section. The next part of for is the comparison that we want to make which is saying if $i is less than or equal to 5 then do the next section after ; which is $i++ the ++ means to increment the variable $i by 1 for each trip through the for loop. Each trip through the loop will also write to the console the current value of $i.
When we run that script we will get an output like:
1
2
3
4
5
Foreach
While For has its applications and will get used, foreach will be incredibly common in your scripts so it’s important to understand how it works.
Let’s look at a basic example before going into a more complicated one:
$List = 1,2,3
foreach ($Number in $List) {
    Write-Host "$Number"
}
This is taking a variable that we have filled with three numbers $List and for each of those objects in the $List it’s setting $Number to be equal to that value, and then writing out the value of $Number before going back to get the next number in the list.
The output will look like:
1
2
3
As an exercise, that example script works well to demonstrate how Foreach functions, but let’s use a real world example that you might possibly use some day.
$List = Get-Content 'C:\temp\filelist.txt'
foreach ($File in $List) {
    Write-Host "Deleting file: $file"
    Remove-Item -Force "C:\temp\$file"
}
We are loading the variable $List with content from a .txt file with a list of filenames and their extensions, then Foreach is taking that list, and for every object in it it is setting $File to be equal to that value then writing to the host with the string “Deleting file: $File” and then finally using Remove-Item to actually delete each file in the list.
So just remember when you see Foreach say “foreach ($Thing in $ListOfThings) {do something}” those two variables can be whatever you would like. So Imagine $Computer in $Computers or $GPO in $GPOS
While
This loop is similar to the for loop, but the while loop starts with a comparison and if that isn’t what the loop is looking for, the body part of the loop won’t trigger at all.
If we were to look at this example:
while ($Number -ne 5) {
    $Number++; Write-Host $Number
}
The structure is slightly different, but the output is identical to the “For” example above:
1
2
3
4
5
Why use while then? Let’s imagine that we want to prompt a user for input, and until that input is entered, we want to keep prompting them:
while (($LetterT = Read-Host -Prompt 'Feed me a T') -ne 'T'){
    Write-Host 'I said feed me a T!'
}
This while will prompt the user to type the letter T and as long as that prompt doesn’t equal T will say “I said feed me a T!” and prompt them again until the while loop is satisfied.
Do-While
It’s technically a separate Do and then a While not all in one word, but in both Visual Studio Code and online you will see it called “Do-While”. There’s a slight difference between how scripts using Do-While instead of While are structured, but the only major thing to remember is that since the condition comes at the end of the loop the body will trigger at least one time.
$Place = 1
do {
    Write-Host "I'm #$Place!"
} while ($Place -ne 1)
In that example it will write to the console “I’m #1!” and then check to see if $Place is equal to 1 and if it is then stop. Now picture changing $Place to 2 what do you think will happen?
I'm #2!
I'm #2!
I'm #2!
I'm #2!
I'm #2!
I'm #2!
I'm #2!
I'm #2!
I'm #2!
...
So watch your loops!
I know that was a lot to cover, but later on in this guide we will have several practical examples that will put this all together.
Formatting/Viewing Objects and Properties
PowerShell has several cmdlets for controlling the display of objects and their properties, and with the amount of data that some of your scripts might be putting out, you will want to know how to control the output so it’s useful for you.
Writing to the Console
Writing to the console directly is a very simple process. Most cmtlets will write some output to the console by default, but there are a few ways that you can modify how the text is displayed that can assist with the usability of your script, or even to just make it look nicer.
The most used cmdlet for adding some text to the console, that you have seen several times throughout this guide, is Write-Host. The command does just what is says, it writes whatever is following the command out to the console. So you can follow up Write-Host with a string, or a variable (depending on the type of quotations you use, see part 1 of this guide), and there are options for changing the font color or background as well, let’s go over some.
Editor’s note: There are many arguments on the internet against using Write-Host in favor of another cmdlet, but for our usage in IT, that is indeed the cmdlet that I or my technicians mean to use, unless we have a specific reason to use another.
Write-Host "Look at me I'm a hacker!" -ForegroundColor green -BackgroundColor black
The command above gives an output that looks like:

It can be very useful if you are running your scripts directly to have your output formatted in a way that will let other people know what is happening. Green text can mean an item has processed and was good, yellow can mean something is in process, and red might mean there was a bad result.
Another Write-Host tip is sometimes you might have a need to have Write-Host not make a new line when it writes to the console. You just need to add the parameter -NoNewLine to your Write-Host command. Next there will be two examples, one without -NoNewLine set and one with.
$Result1 = "One"
$Result2 = "Two"
Write-Host $Result1
Write-Host $Result2
One
Two
$Result1 = "One"
$Result2 = "Two"
Write-Host $Result1 -NoNewline
Write-Host $Result2
OneTwo
Not too exciting, but is still an interesting tool for your PowerShell toolbox.
Text written to the console through Write-Host will also end up in standard out, so if you are running your scripts through a management platform instead of directly, you should be able to read the results there to help you dial in the function or success of your script.
Write-Progress
The Write-Progress cmdlet displays a progress bar in the console window, and has many ways to change how and what data is displayed. If you are running a very long script, it can be useful to see the general progress or place the script is at. Let’s use a simple example and see the result.
for ($i = 1; $i -le 100; $i++ )
{
    Write-Progress -Activity "Counting sheep" -Status "$i% Complete:" -PercentComplete $i;
    Start-Sleep 1
}
This For loop has a variable $i that (as long as it’s less than 100) PowerShell will keep adding 1 to each time it passes through the loop. Write-Progress is writing “Counting sheep” to the progress bar, and then using the variable $i and its progress to 100, and showing that as a percentage of completion in a graphical bar. The Start-Sleep 1 was added to make the loop slower for demonstration purposes.

For a slightly more practical example, although the script serves no purpose, we have this example with a concept that will work for many of your scripts.
$Customers = Get-Content -Path 'C:\Temp\Customers.txt'
$i = 0
foreach ($Customer in $Customers) {
    $i = $i + 1
    Write-Progress -ParentId -1 -Activity "Gathering Customer Data" -PercentComplete $($i / $Customers.Count * 100) -Status "$($Customer) ($($i)/$($Customers.Count))"
    Start-Sleep 1
}

Format-X
Here we will run a PowerShell command to pull a list of some of the cmdlets we will be going over
Get-Command -Verb Format -Module Microsoft.PowerShell.Utility
Which will return something like:
CommandType     Name                                               Version    Source
-----------     ----                                               -------    ------
Cmdlet          Format-Custom                                      7.0.0.0    Microsoft.PowerShell.Utility
Cmdlet          Format-Hex                                         7.0.0.0    Microsoft.PowerShell.Utility
Cmdlet          Format-List                                        7.0.0.0    Microsoft.PowerShell.Utility
Cmdlet          Format-Table                                       7.0.0.0    Microsoft.PowerShell.Utility
Cmdlet          Format-Wide                                        7.0.0.0    Microsoft.PowerShell.Utility
If we take one of the first commands that we ran in this guide, for finding the properties of a running Notepad process, and look at the default output, it’s actually pretty readable, but what if you wanted to view the output in a different format?
Format-List
Let’s take the same command, and then pipe that to Format-List:
Get-Process | Where-Object {$_.ProcessName -eq 'Notepad'} | Format-List
The output now looks like:
Id      : 3308
Handles : 161
CPU     : 11.984375
SI      : 1
Name    : notepad
So instead of the output being in a table format, it’s now a list.
We will take a look at one way to filter the output for only the properties we want to see. There are several ways to do this, but for this example you simply add the properties you are interested in seeing after the Format-List command, separated by commas.
Get-Process | Where-Object {$_.ProcessName -eq 'Notepad'} | Format-List Id,Name
Id   : 3308
Name : notepad
Why would you ever want to change a default output from a handy table to a list? Next up we will be looking at that with one tweak to the Format-List command.
When you run a command like Get-Process (and most others) the output you see is curated, that is preformatted for you ahead of time for the properties you are most likely interested in. Much like above where you could pick the properties you wanted by adding them to the end of the command, you can also specify all of the properties. You do that by adding the -Property parameter, and then providing the property you want, in this case the wildcard of *
Get-Process | Where-Object {$_.ProcessName -eq 'Notepad'} | Format-List -Property *
If you run that yourself you will see the result is extremely long, imagine if it was all presented in a table format horizontally. However, being able to look at all of the details will help you find properties you are interested in purposefully specifying.
Name                       : notepad
Id                         : 3308
PriorityClass              : Normal
FileVersion                : 10.0.14393.0 (rs1_release.160715-1616)
HandleCount                : 161
WorkingSet                 : 12005376
PagedMemorySize            : 2179072
PrivateMemorySize          : 2179072
VirtualMemorySize          : 118374400
TotalProcessorTime         : 00:00:12.4218750
SI                         : 1
Handles                    : 161
VM                         : 2199141629952
WS                         : 12005376
PM                         : 2179072
NPM                        : 10720
Path                       : C:\Windows\system32\notepad.exe
Parent                     : System.Diagnostics.Process (explorer)
Company                    : Microsoft Corporation
CPU                        : 12.421875
ProductVersion             : 10.0.14393.0
...
Format-Table
If we run the command again, but switch out Format-List for Format-Table, you will see a very boring output
Get-Process | Where-Object {$_.ProcessName -eq 'Notepad'} | Format-Table
 NPM(K)    PM(M)      WS(M)     CPU(s)      Id  SI ProcessName
 ------    -----      -----     ------      --  -- -----------
     10     2.08      11.45      12.67    3308   1 notepad
Which is to say it looks exactly the same as just running Get-Command without the Format-Table command at all, and that’s because Get-Command is already presented in table format. Not all commands output in the same format, that’s why it’s important to remember that you can pipe their output to Format-List or Format-Table.
Table format is really great for readability of your output, but there are cases where the data might be too large for the column its displayed under and might be truncated. One way to help with this is using the -Autosize parameter which will calculate the column widths based on the size of the data dynamically.
Get-Process | Where-Object {$_.ProcessName -eq 'Notepad'} | Format-Table -Autosize
NPM(K) PM(M) WS(M) CPU(s)   Id SI ProcessName
------ ----- ----- ------   -- -- -----------
    10  2.08 11.45  12.67 3308  1 notepad
GroupBy
There’s a parameter for the Format-x cmdlets called -GroupBy which can take the results from a command like Get-Service and instead of just displaying the results alphabetically, can group them by a common property. For example: a status of stopped or running
Get-Service | Sort-Object status | Format-Table name, status -GroupBy status
Group-Object
Using this example from Microsoft: “The Group-Object cmdlet displays objects in groups based on the value of a specified property. Group-Object returns a table with one row for each property value and a column that displays the number of items with that value.” Here is Group-Object being used in a way that I have used it personally in troubleshooting issues in IT.
$files = Get-ChildItem -Path $PSHOME -Recurse
$files | Group-Object -Property extension -NoElement | Sort-Object -Property Count -Descending
Count Name
----- ----
    2 csrss
   30 msedge
    2 NVDisplay.Container
   17 svchost
Out-GridView
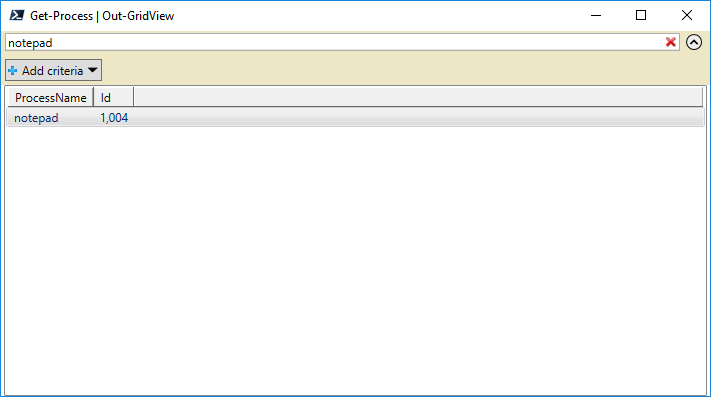
Out-GridView is an often overlooked cmdlet, but can be invaluable when dealing with a large number of PowerShell objects in a a table. It’s not as practical when scripting from a management platform, but if you are still figuring out the exact structure of your script and picking what properties are important to you, there’s no quicker way to go over or filter the data.
How it works is you pipe your output to Out-Gridview just as you would with Format-Table, but instead of the results showing inside of the PowerShell window they are displayed in an interactive table within Windows.
Get-Process | Out-GridView
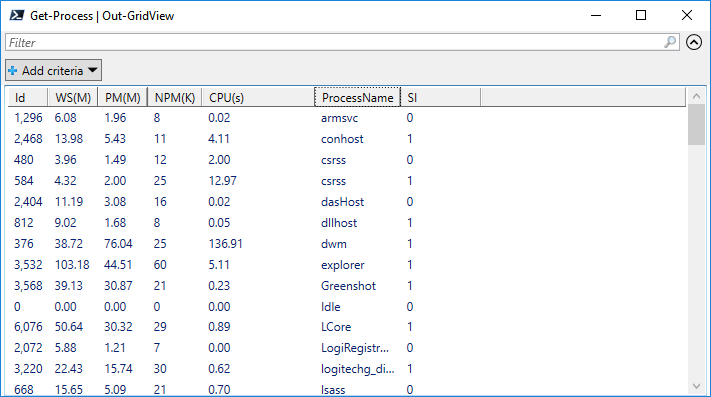
You can expand and rearrange columns, choose columns to display, and filter at the top for values.
Export-CSV
If the name of this cmdlet should tell you all you need to know about it, but suffice it to say you absolutely will be using this command at some point in IT. It works exactly like the other format options we just covered, only it will output the results into a .csv file that you specify.
Get-Process | Export-Csv -Path 'C:\temp\process.csv'
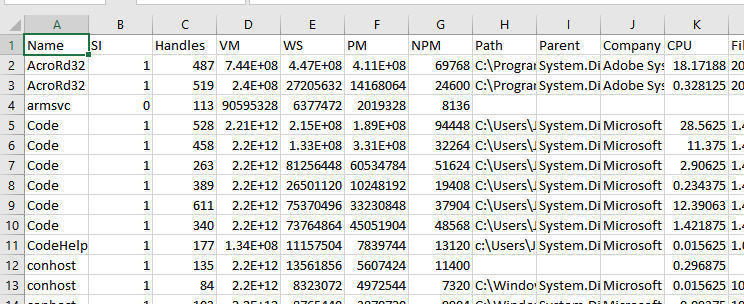
That CSV will have a ton of data in it, but just like you have been doing throughout this guide, you can filter the results that you wish to see and select only those objects you are interested in. The next command will be much the same, but will add a few more parameters and cmdlets to dial it in to exactly what you want as well as some best practice when using Export-CSV
Get-Process | Where-Object {$_.Name -Like 'notepad'} | Select-Object Name,ID| Export-Csv -Path 'C:\temp\process.csv' -NoTypeInformation -Force
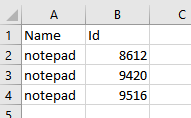
We got all of the process, picked the ones with a name like notepad, selected the properties we wanted (name and id) then exported that to a .csv file with the parameters to remove the type information and to force the creation of the csv even if it’s read only. There more to this cmdlet such as appending results to to a file instead of making a new one that can be read about here https://docs.microsoft.com/en-us/powershell/module/microsoft.powershell.utility/export-csv
Summary
That’s the end of the advanced section of the PowerShell guide. I hope some of these topics were enlightening for you as you learn PowerShell.
We covered:
Logic like if, else, and loops
Formatting and viewing objects
And a few ways to output data